![]()
![]()
| Subscribe Now |
Chocolate Wafers:
1 1/2 cups (195 grams) all purpose flour
3/4 cup (75 grams) unsweetened cocoa powder (regular or Dutch-processed)
1/4 teaspoon (1 gram) baking soda
1/2 teaspoon (2 grams) salt
10 tablespoons (140 grams) unsalted butter, at room temperature
1 cup (200 grams) firmly packed light brown sugar
1/2 cup (100 grams) granulated white sugar
1 1/2 teaspoon (6 grams) pure vanilla extract
3 tablespoons whole milk or light cream, or more if needed
Cream Filling:
2 cups (480 ml/grams) cold heavy whipping cream (35-40% butterfat content)
1/2 cup (120 grams) Mascarpone Cheese
1/4 cup (40 grams) confectioners sugar (powdered or icing sugar), sifted (or to taste)
1/2 teaspoon (2 grams) pure vanilla extract
Chocolate Wafers: In a bowl, sift or whisk together, the flour, cocoa powder, baking soda, and salt.
In the bowl of your electric stand mixer, fitted with the paddle attachment (or with a hand mixer), beat the butter until smooth. Add the sugars and vanilla extract and beat on medium high speed until light and fluffy. Scrape down the sides and bottom of the bowl as needed. Add the flour mixture and beat just until incorporated. Then beat in the milk.
Place the batter on your counter and, using your hands, evenly form the batter into a 10 inch (25 cm) long round log. Carefully wrap the log in plastic wrap. Try not to flatten the log. Refrigerate until firm. This will take several hours or even overnight.
Preheat your oven to 350 degrees F (180 degrees C) and place the oven rack in the center of the oven. Line two baking sheets with parchment paper.
Using a sharp knife, slice the log into 1/4 inch (6 mm) thick wafers. Place the wafers on the baking sheet spacing about 2 inches (5 cm) apart. Bake for approximately 12 to 14 minutes or until the the cookies are firm and the tops of the cookies have cracks (ripples). Remove from oven and let the cookies cool on the baking sheet for about 5 minutes before removing to a wire rack to cool completely. Can be stored in an airtight container, at room temperature, for about 10 days. They can also be frozen.
Icebox Cake: In the bowl of your electric stand mixer, fitted with the whisk attachment, (or with a hand mixer) beat the cream, mascarpone cheese, sugar and vanilla until stiff peaks form.
Next, you will need an 8 inch (20 cm) cake or springform pan with 3 inch (7.5 cm) sides. Line the bottom and sides of the pan with plastic wrap. Cover the bottom of the pan with a layer of chocolate wafers (about 6-7 cookies), tops of the cookies facing down. (See video for demonstration.) Next, cover the chocolate wafers with an even layer of whipped cream (about 3/4 - 1 cup (180 - 240 ml)). Repeat the layers 4 more times so you will end up with 5 layers of chocolate wafers and 5 layers of whipped cream. Cover the top of the pan with plastic wrap and place in the refrigerator overnight (about 24 hours). (This is so the cream has time to be absorbed into the chocolate wafers, giving them a dense, almost cake-like texture.)
When ready to serve, invert the pan onto your serving plate, so the bottom of the cake is now the top. Remove the plastic wrap. If desired, take the remaining chocolate wafers and place them in your food processor and process until finely ground. Gently press the cookie crumbs onto the sides of the cake. This cake can be stored in the refrigerator for about 4 to 5 days.
Makes one 8 inch (20 cm) cake.
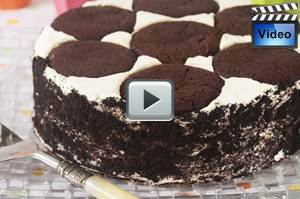
You make this No Bake Icebox Cake by layering Chocolate Wafer Cookies with whipped cream, and then chilling it until firm. This type of dessert became very popular when Nabisco started printing a recipe on the back of the box of their Famous Chocolate Wafers. Their recipe calls for spreading the chocolate wafers with whipped cream, stacking them into a log shape, and then covering the log with more whipped cream. For this recipe we are actually making a round cake and we are using Homemade Chocolate Wafer Cookies. Once assembled, the cake needs to be chilled in the refrigerator overnight, so the cream has time to be absorbed into the crisp and crunchy Chocolate Wafers, giving them a dense, almost cake-like texture that can be easily sliced.
For this recipe we are alternating five layers of Homemade Chocolate Wafers with five layers of whipped cream. I love Homemade Chocolate Wafers. They have a wonderfully crisp and crunchy texture and a deep chocolate flavor. And they're eggless. The chocolate flavor comes from unsweetened cocoa powder, and you can use either Dutch processed or natural unsweetened cocoa powder.
For the delicious Cream Filling, we are combining heavy whipping cream with mascarpone cheese, pure vanilla extract, and sugar. Mascarpone Cheese is wonderfully thick, buttery-rich, delicately sweet, and velvety smooth. It adds a depth of flavor and texture to this Cream Filling. Mascarpone Cheese is normally sold in plastic 8-ounce (225 gram) tubs. You can usually find it in specialty food stores and in the deli section of your local grocery store. But if you cannot find Mascarpone a good substitute would be an equal amount of regular cream cheese.