![]()
![]()
| Subscribe Now |
Butternut Squash Puree:
one 2 - 2 1/2 pound (about 1 kg) Butternut Squash
Pie Crust:
1 1/4 cups (175 grams) all-purpose flour
1/2 teaspoon (2 grams) salt
1 tablespoon (15 grams) granulated white sugar
1/2 cup (113 grams) cold unsalted butter, cut into 1 inch (2.5 cm) chunks
3 - 4 tablespoons ice cold water
Gingersnap Layer: (optional)
1/4 cup (25 grams) crushed gingersnap cookies
Butternut Squash Filling:
3 large eggs, at room temperature
1/2 cup (110 grams) firmly packed light brown sugar
2/3 cup (160 ml/grams) half-and-half cream, at room temperature (can also use heavy or light whipping cream)
1/2 teaspoon (2 grams) pure vanilla extract
1 teaspoon ground cinnamon
1/2 teaspoon ground ginger
1/8 teaspoon ground cloves
1/2 teaspoon (2 grams) salt
2 cups (425 grams) Butternut Squash Puree
Maple Whipped Cream: (Optional)
1 cup (240 ml/grams) cold heavy whipping cream (cream with a 35-40% butterfat content)
1 1/2 tablespoons pure maple syrup
Butternut Squash Puree: Preheat your oven to 400 degrees F (200 degrees C). Line a baking sheet with parchment paper or foil. Rinse and dry the Butternut Squash. Cut the squash in half lengthwise and scoop out the seeds. Lightly brush the flesh of the squash with a flavorless oil. Place the squash halves, cut side down, onto the baking sheet. Bake for about 45 to 60 minutes or until the flesh is soft and tender when pierced with a knife. Remove from oven and place on a wire rack. Turn the squash over so the cut sides are facing up and let cool. Then scoop out the flesh with a spoon and place in your food processor. Process until you have a smooth puree. If not using straight away, cover and store in the refrigerator for up to a week.
Pie Crust: In your food processor, place the flour, salt, and sugar and process until combined. Add the butter and process until the mixture resembles coarse meal (about 10 seconds). Sprinkle about 2 - 3 tablespoons of water over the flour mixture and process just until the dough holds together when pinched. (You don't want a solid ball of dough.) If necessary, add more water.
Turn your dough onto your work surface, gather it into a ball, and flatten into a round. Cover with plastic wrap and refrigerate for about one hour or until firm. This will chill the butter and relax the gluten in the flour.
After the dough has chilled sufficiently, remove from the fridge and place on a lightly floured surface. Roll the pastry into a 12 inch (30 cm) circle. (To prevent the pastry from sticking to the counter and to ensure uniform thickness, keep lifting up and turning the pastry a quarter turn as you roll (always roll from the center of the pastry outwards).) Loosely roll the pastry around your rolling pin and transfer to a 9 inch (23 cm) pie pan. Brush off any excess flour and trim the edges of the pastry to fit the pie pan. Crimp the edges. If desired, press the crushed gingersnap cookie crumbs evenly onto the bottom and up the sides of the unbaked pie crust. Cover with plastic wrap and place in the refrigerator to chill while you preheat your oven.
Preheat your oven to 375 degrees F (190 degrees C) and place rack in bottom third of the oven.
Butternut Squash Filling: In a large bowl whisk the eggs until frothy. Whisk in the sugar, and then the cream, vanilla extract, ground spices, and salt. Stir in the Butternut Squash Puree. Pour the mixture into the unbaked pie shell and place on a larger baking pan to catch any spills. Bake the pie for about 45 - 50 minutes or the crust has nicely browned and the filling is just set, but the center will still look wet. (A knife inserted about 1 inch (2.5 cm) from side of pan will come out almost clean.)
Place the baked pie on a wire rack to cool. Serve,warm, at room temperature, or cold with maple whipped cream. Store any leftovers at room temperature about two days or in the refrigerator for three to four days.
Makes one 9 inch (23 cm) pie.
Maple Whipped Cream: Place the heavy whipping cream and maple syrup in bowl of your electric mixer. With the whisk attachment, whip the cream until soft peaks form.
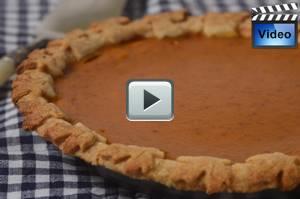
My Mom made a really good Pumpkin Pie, or so I thought. It wasn't until she was in her eighties that she told me her secret. She made her "Pumpkin" Pies with homemade butternut squash puree, not pumpkin puree. So, in fact, she was making a Butternut Squash Pie, not a Pumpkin Pie. I couldn't wait to make this pie, because in the past I had only used butternut squash in savory dishes. What I found is the mildly sweet, almost nutty flavor of butternut squash is perfect in a dessert pie. In fact a Butternut Squash Pie is very similar in both looks and flavor to a Pumpkin Pie.
Both Pumpkin and Butternut Squash Pies are considered "soft" pies because they're made with an unbaked crust and an uncooked custard-like filling that are baked until the crust has browned and the filling has set. As with a Pumpkin Pie I like to sprinkle the unbaked pastry crust with crushed gingersnap cookie crumbs as it adds a mild ginger flavor plus prevents the crust from becoming soggy.
Butternut Squash is a Winter Squash that has an elongated shape, with a long neck and a bulb at one end that contains seeds. Its outer cream colored rind is thick, hard, and inedible. Inside the sweet, mild flavored flesh is bright orange. To make Butternut Squash puree you first need to roast the squash until its flesh becomes soft and tender. This really brings out its sweet, almost nutty, flavor. Once the flesh has cooled, it is pureed until smooth. You can use the butternut squash puree right away or it can be covered and stored in the refrigerator for about a week.
The main problem people can have with custard pies is that the filling has a tendency to crack. There are a few things we can do to minimize the amount of cracking. One, do not over mix the ingredients. I find it best to mix the ingredients together by hand, not in a mixer or food processor. Second, do not over bake the pie. Remove the pie from the oven when it is just set (the center of the pie will still look a little wet), and a knife inserted into the filling about 1 inch (2.5 cm) from the side of the pan comes out almost clean.